
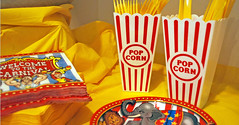
I picked up these cute popcorn tubs in the dollar aisle! I was able to use them for three purposes: flower vase, silverware holder and a container for the candy bar/desert table.
12.20.2009
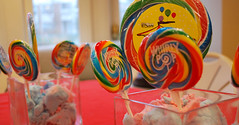
A Sugary Sweet Circus Concoction
What screams circus more than cotton candy? Sweet goodies double as centerpiece. Vases stuffed with cotton candy and adorned with whimsical Whirly Pops.
Step Right Up...
Get your ticket!
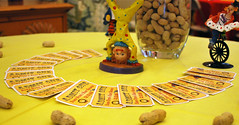
Entry table to the Main Event. Clowns purchased on EBay. Vase in background is filled with peanuts holding a "TICKETS" sign. Tickets designed by bndesigns.
Entry table to the Main Event. Clowns purchased on EBay. Vase in background is filled with peanuts holding a "TICKETS" sign. Tickets designed by bndesigns.
The Main Event
Welcome to the Main Event!
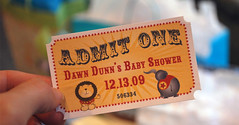
All Buttoned-Up hosted a circus themed baby shower for a special guest of honor. Invitations, tickets (shown above), signs, favor tags and cupcake favors were made by bndesigns
12.19.2009
Etsy Love
We're nestled in for a really snowy DC weekend. Hopefully I will get things finalized with AllButtoned-Up and get ahead on packing our house for the big move!
My good friend just opened up her Etsy Shop. Be sure to check out her art @ http://www.etsy.com/shop/blissfulbeauty
12.06.2009
It Must Be the Mirror

It's official - we received a contract on our home. It must be the mirror! Fingers crossed all goes smoothly over the next 30 days and I will be one step closer to my rustic white desk. Couldn't you see me planning the perfect event behind a beauty like this?
12.05.2009
Mirror Mirror On the Wall, You're the Fairest of Them All


First, Let me apologize for slacking on my blog!! Things have been pretty busy, both personally and professionally. In the matter of a few short weeks, we have listed our home for sale, planned the "Main Event Of The Year" baby shower for my expecting sister-in-law, celebrated the Holidays with friends and family and to top it all off are finalizing my website launch!
I promise to not be so neglectful once we settle in our new home and I finally have my long dreamed of personal office space with a little white rustic desk! My husband may disagree, but I plan on it being one of my first new furniture purchases. It may be my cheapest - I am talking a restored goodwill piece here. I will know it when I see it!
I can't wait to find our new home and have my new office, but I know I will miss our first place that we lived together as a dating couple and a married couple, having a small home to clean, and most of all my newly remodeled bathroom with the mirror I designed.
This could be my next entrepreneurship - I can just see my graphic designer laughing in vain and thinking let's get All Buttoned-Up off the ground and then talk to me in 2 - maybe 5 years ha! Seriously though, budget of $10 made this beauty! I am lucky enough to be in a family of contractors and found/"borrowed" :) the mirror and wood from my dad's shop. But, even if you purchased it you are only talking small costs for the mirror and wood. I have seen similar mirrors selling at high-end stores for $300+. It was the cheapest and easiest part of our bathroom renovation and the piece that gets the most comments!
Materials: Mirror, Wood, Nails, Glue (strong mirror glue to hold to the wall), paint, chain or other "damage" materials
Step One - Cut mirror and glue to the wall
Step Two - Make the wooden frame. Simply nail the pieces of wood together to border the mirror like a picture frame. This doesn't have to be neat - if the nails show it will complete the look in the end.
Step Three - Destruction. Using whatever you can think of ruff this baby up! I took a chain and beat the wood over and over and hammered it.
Step Four - Paint! I used two colors. First, I painted green for the base color real thin and spotty not covering in some parts. Before the green dried, I started painting brown on top smearing the green some, letting it show through in some parts and covering it in others. After it dried, I took sandpaper to parts of it for an extra weathered look.
Step Five - Tack the frame on the mirror & enjoy!
Subscribe to:
Posts (Atom)